Jul 28, 2011

Strawberry Coconut Cupcakes


I've got a delicious cupcake recipe for you today!

I love making homemade strawberry frosting to put on cupcakes.  I decided to combine that with coconut - two flavors that I think are delish alone.
Put them together?  Yummy!

Let's get this party started!


Strawberry Coconut Cupcakes
CAKE:
1 package white cake mix
3 egg whites
1/3 cup vegetable oil
2/3 cup applesauce
1 tsp coconut extract
1 cup coconut

FROSTING:
1 cup butter
1/4 cup strawberry puree*
1 tsp vanilla
5 cups powdered sugar


Mix all of your cake ingredients together.  Follow the instructions on the box as far as how long to mix the batter.  Then bake your cupcakes according to the box.  Let the cupcakes cool.

For the frosting, mix the butter with a hand mixer (butter should be a little chilled, but not hard).  Add the strawberry puree* and the vanilla and mix until well blended.  Add your powdered sugar.  You may want to add a little more or a little less, depending on the consistency you want your frosting to be.  I wanted mine a little thicker, so I used a little more sugar.


* To make the strawberry puree, blend about 1/2 cup of fresh or frozen (but thawed) strawberries in a blender until they are pureed.  Not too hard :)


Then you can decorate your cupcakes however you'd like!  I put a slice of strawberry and then sprinkled some coconut on mine to make them pretty.  Cuz it's more fun eating pretty cupcakes, right?! 


Now it's time for you all to get your cupcake on!!!
What fun flavors do you like to make?


PS - I had more pics, but either Blogger or my internet was being SO SLOW tonight!!!!  So I gave up after waiting for almost 2 hours to upload the last few pics . . .  Maybe I'll try again tomorrow . . .


To see where I link up, check out my sidebar! -->

Jul 18, 2011

DIY Flag Shirts

  
Aren't these shirts so cute?


I am not a seamstress.  Like, at all.
I like to pretend I can sew, but really I suck at it.  So when I find easy sewing projects like this, it makes me happy because I feel like I CAN sew!  Yahoo!

I decided to sew a few buttons on, just cuz I thought they would be cute :)

{On the 4th @ the local parade}

I know the 4th of July has already come and gone, but if you live in Utah, the 24th of July celebrations are next week - you have time to make them!  Or you can bookmark Jen's tutorial for next year.

I got the tank tops at Walmart for $2.50/each.  I also got the fabric at Walmart in the cheap fabric bins.  The buttons I had on hand.  So these shirts probably cost me right around $3.00 to make.  Not too shabby.

{I take what I can get as far as pics go with my 2-yr-old - she's always on the move!}

Head on over to TT&J to see how you can make your own!

Jul 14, 2011

{Homemade} Garden Veggie Spaghetti Sauce

 
Time for another recipe, my friends!
Remember my Spaghetti Squash Spaghetti recipe?  This is sort of an extension of that recipe . . .

I decided to make my own spaghetti sauce.  It's SO easy to do, and so much better for you.  I looked at the ingredients in the kind we usually buy and it has high fructose corn syrup!  In spaghetti sauce?  Is that really necessary?  Plus some other stuff that I can't pronounce, like most pre-made things you buy at the store.

I like my spaghetti sauce chunky, so I made a garden veggie spaghetti sauce and it turned out so yummy, I had to share :)


Homemade Garden Veggie Spaghetti Sauce

Ingredients:
1 yellow onion, diced
2 cloves garlic, minced or finely chopped
1 zucchini, chopped
3/4 c cup mushrooms, chopped
1 15 oz can tomato sauce
 1 6 oz can tomato paste
1 14.5 oz can diced tomatoes
1 Tbsp fresh chopped basil (or more to taste) or 1 tsp dried basil

To start out, chop all of your veggies, like so:

Add a little bit of olive oil to your saute pan, add your garlic (let that cook for a minute or so on it's own in the oil), onion, and zucchini.  Then salt & pepper all of that.  It would also be yummy with a green pepper and carrots . . .
When the onion and zucchini are just about cooked, add your mushrooms, with another light layer of salt & pepper.  

Then it's time to add your tomato sauce, tomato paste and diced tomatoes:


Stir the tomato sauce and tomato paste in with the veggies.  The paste is really thick, so just keep stirring until it is fully incorporated.  Once it's incorporated, add the diced tomatoes.  If you'd like, you can add a little sugar at this point.  I didn't add any to mine.  Just start with a teaspoon, or even a half teaspoon, and go from there, adding 1/2 to 1 tsp at a time until it is at your desired sweetness.  You will also want to salt & pepper again at this point.

Stir your basil in (I used fresh oregano, too, but not sure how much I used . . . feel free to season up your sauce!).


I then let the sauce simmer for about 30 minutes while I got the rest of the meal prepared.


I served my spaghetti  with these yummy Mozzarella stuffed Meatballs from Picky Palate.  They were really yummy!  I used turkey burger instead of ground beef.  They were moist and delicious, not dry at all, just like meatballs should be!


And, of course, top off your prepared spaghetti with a nice sprinkling of parmesan cheese!  I love eating healthy - especially when it's easy.  Making your own sauce and using spaghetti squash for your noodles is a great way to cut out preservatives and add your veggies.

ENJOY!!!

To see where I link up, look at the bottom of my sidebar -->

Jul 3, 2011

Better late than never . . .

I wanted to share what I gave my hubby for Father's Day!
I know, I know, Father's Day was last week.
But, like the title of this post says, better late than never, right?


I'd seen this done before on other people's blogs (sorry, I don't have any specific blogs to give credit for this!  I've seen it done on a bunch of them) and thought it was SO CUTE!  I wanted to do it last year but ran out of time.  So this year, I was all over it, baby!

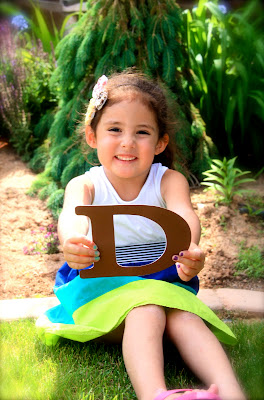
I was originally going to buy a wooden "D" and a wooden "A" but decided I was too cheap :)  So instead, I cut them out on my Cricut and hoped the girls wouldn't rip them during our photoshoot.  Luckily for me, no paper letters were harmed during the photoshoot.

These are the photos I picked of the girls:

Aren't my girls beautiful?
I might be a little biased . . . but they really are :)


And some shots of the finished product in my house:


I got the frame for $10 at Target and I printed the photos out at Walmart.  So this wonderful Father's Day gift cost less than $15! 

The most important thing was that my husband LoVeD it!  I might try to coordinate one for my dad next year with all the grand kids.

My girls love their daddy - and let me tell you, he is a GREAT dad.  I'm not just saying it.  It's really true.  My girls are lucky to have such a loving and devoted father.  We love you!!!


Hope you all have a happy 4th!  Bring on the BBQ!
Related Posts Plugin for WordPress, Blogger...