Jan 9, 2011

{Chocolate Peanut Butter Cupcakes}


Oh.  My.  Yummy.

I needed to make some treats for some people.
I like to make treats that I would like to receive.
So I decided to make cupcakes.

But not just any cupcakes.

{Chocolate Peanut Butter Cupcakes}!

Peanut Butter, oh how I love you!
And mixed with chocolate?  
How can you go wrong?


 Here's the recipe:
{Chocolate Peanut Butter Cupcakes}

1 box chocolate cake mix
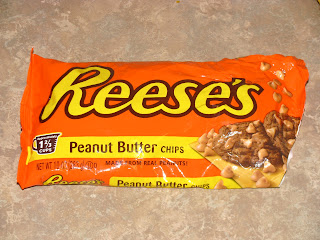
1 package Reese's Peanut Butter Chips


I started with my chocolate cake mix (I bought what was on sale) 
and these:
 Which, by the way, are delicious in and of themselves.

I made the cake mix according to directions, but I added about 1/3 c applesauce (I used the snack cups that my kids eat) to help keep the cupcakes nice and moist.

Then I added the chips:

 I spooned them into my cupcake wrappers in my muffin tins and baked according to the directions on the cake mix (the cake mix I used said to fill the cups 1/2 full but I filled mine about 3/4 full.  I like my cupcakes BIG!).


While the cupcakes were cooling, I made the peanut butter frosting.
This, my friends, is what makes these cupcakes oh. so. yummy.


Peanut Butter Frosting

2 Tbsp butter
2/3 c peanut butter (heaping)
5 c powdered sugar
6 to 7 Tbsp milk

I usually just make up my frosting recipes, so when I made this one, I made it up, too.  I started with 1/3 c peanut butter, added 1 Tbsp butter, added some powdered sugar and then a little milk.  It did NOT make enough frosting!  So I doubled this recipe for you so you can cover all of your cupcakes.  

I know, I know.  You're welcome :)

I creamed the butter and the peanut butter:
 {remember, you want your peanut butter heaping}

Next I added the powdered sugar.  Mix until well blended. 

It will be really thick at this point.  Add your milk a little at a time until you get your desired consistency.  You can use a little more or a little less than the recipe says.  Play around with it until you get your desired consistency.  I wanted mine pretty thick, at least a little thicker than I usually make frosting.  I actually had half and half on hand so I used that to make my frosting extra creamy.

Blend a little longer than you think is necessary.  I think this helps the frosting become extra smooth, but it's not scientifically proven to do so :)

Next, get a plastic sandwich bag and spoon the frosting in (I forgot to take pics, dang it!).  Fill it up and zip it closed.  Snip the corner with some scissors:
{Note:  snip the corner AFTER you fill the bag with frosting!  Since I forgot to take pics while I was actually doing it, I took a pic after for your viewing pleasure}

Starting on the outer top of the cupcake, squeeze your bag and swirl it around the cupcake until you have covered the whole cupcake.
 
I promise you, this is easier than just using a knife and spreading it on.  Plus it's so much prettier!  It makes the cupcakes feel fancy :)

How fun would it be to add a sprinkling of mini chocolate chips on top?

And that, my friends, is how you can make yourself a chocolatey, peanut-buttery treat.  Mmm, mmm good!

Jan 6, 2011

Frame Solutions


A few months ago, I took my friend's family pictures.
I hadn't gotten around to editing all of them (we took them right before the holidays - that's my excuse!) and this week my friend's birthday rolled around.

I thought, perfect!  I can edit, print and frame one of the pics for her birthday present!

I get almost all of my frames at the thrift store.
You can get high-quality frames that are solid wood for SO CHEAP!
And most of them just need a little coat of paint to look great.

So I found a frame (it was a pinkish/peachy color) and spray painted it.
It was FREEZING outside when I painted it.  Needless to say, the paint wasn't drying right.  But you know what?  I like how it turned out!  It looks like I distressed it, and I didn't have to do any of the distressing myself - score!  You can see it in the pics below.

Here's a pic to show the "before" color - I forgot to take a pic of the frame and the beautiful pic that was in it before :)  But here's a pic of the mat.  It matched the frame almost exactly:

I bought a white mat at the store.  When I put the mat and picture together in the frame, the frame was too big!  It was supposed to be an 11x14, but it was more like a 12x14.  There was an extra 1/2 inch on either side of the mat that you could see through the glass.
 {It's kind of hard to see in the pic above . . .}

{but you can totally see it here}

I was ready to go buy a new frame.  Then I thought there had to be something I could do so that I could use that frame!

I opened my ribbon cabinet and saw the perfect ribbon to line the mat with!
So I cut the ribbon to fit down the mat:

I wrapped the ends around the mat and hot glued it:

And here's what it looked like:

After putting it in the frame, I thought it turned out great!  It added a little bit of style to the picture.  
Here's a close-up:

And the whole frame again:

It solved my problem and made the picture even better!

When you're in a crafting dilemma, use your creativity to solve your problem!  I saved myself money by not having to buy another frame {plus the time I spent spray-painting}.

Happy crafting!

Jan 3, 2011

Fun Book Plates

A few months ago, I downloaded this adorable free printable 

Isn't it cute?
She made them to be Give Thanks gift tags, but she also made these blank ones.


I wasn't sure what I wanted to do with it, but I saved it to use in the future.
Well, the other day, I figured out what to do with it!

I've been wanting to make myself some book plates.
It hit me that these would make the perfect book plates!

So I opened up Photoshop and worked my magic!
Actually, all I had to do was add some words in cute fonts.
So easy, and so cute!


What do you think?


I printed them off on printable sticker paper and cut them into squares.


I've already put them to use!

I already had the sticker paper, so this project was FREE!

And now when I let people borrow my books, 
they will remember who to return it to!

Jan 1, 2011

Fresh Mex Chicken Tacos

Happy 2011, everyone!
I hope you have all had a wonderful holiday season!

Since many of you are making New Year's Resolutions,
I'm guessing at least some of you will have a resolution to 
become healthier.

That was one of my resolutions last year.
Not to get skinny, but to get healthy.
And you know what?  I actually did it!
In 2010, I lost 30 pounds and feel the best I've ever felt.

So, to help all of you become the healthy women you want to be, I'm going to share some healthy recipes!

This is one of my favorites!
And it is SO super easy.  Today's recipe is my 
Fresh Mex Chicken Tacos


Fresh Mex Chicken Tacos
{This recipe will feed about 5 people}
4 chicken breasts, cut into cubes
1/4 to 1/2 medium yellow onion
1/4 to 1/2 cup chopped cilantro
1 to 2 medium tomatoes, diced
12 Corn tortillas
Fresh lime (optional)
Sour cream (optional)

Start by cutting your chicken breasts into cubes BEFORE you cook them.  I like to do mine into bite-size cubes.  Heat your skillet and drizzle some olive oil.  Add your chicken.  For your seasoning, sprinkle some garlic salt and pepper.  I also season mine with Mrs. Dash Spicy Chicken seasoning {not too much, it's spicy!}.  If you don't have the Mrs. Dash, you can season with cumin and chili powder (I like to generously sprinkle it over all of the chicken).


While the chicken is cooking, heat a smaller skillet/fry pan to medium/low.  When it heats up, add your corn tortillas (no oil or cooking spray).  You don't want them too crispy, so keep an eye on them.  When the first side is starting to brown a little, flip it over.


Okay, in between all of this, you can start dicing your onion and tomato and chopping your cilantro.

Once your chicken is cooked, and you have a few tortillas ready, you can start putting your tacos together.  Start with the tortilla, add your chicken and all the fixin's!  Sometimes I will add a little taco sauce (like the Taco Bell kind you can buy at the grocery store).  

If you have a lime, cut it into wedges and squeeze a little on top.  
Each person will eat at least two of these (I usually eat 2 and my husband usually eats 4).
This is one of my favorite meals lately.  
These tacos are healthy, delicious and really easy to make.


Good luck on your quest to become healthier in 2011!
ENJOY!


P.S. Let me know if you need some tips to help you get started on losing weight/becoming healthy.  It's something I'm passionate about!

Dec 28, 2010

Goodbye Christmas :'(

I can't believe Christmas is over!
December was such a busy month, and now here we are at the end of it.

I feel like I can relax, breath a little now.
Anyone else feel the same?

But I'm always sad to put my Christmas decorations away.  
It means almost another year before I take them out again.
And I {heart} Christmas!


Here are a couple pics of my tree this year:


My kids {especially my 18-month-old!} loved playing in it, around it and with the ornaments!

I spray painted some frames, distressed them and gave them away as Christmas presents. 
Didn't they turn out cute?


I hope you all had a Merry Christmas
and I hope you have a Happy New Year!
Related Posts Plugin for WordPress, Blogger...